Tuesday 27 September 2011

Quick review: Afterglow cosmetics

After my holiday I came back a shade too dark for my regular foundation and was reluctant to buy a foundation just for the short time I am tanned. I felt lucky when I came across an old foundation I had that just happens to be the perfect shade.


The foundation is by Afterglow cosmetics an American company I believe which has an online supplier in the UK. I received a starter/tester pack as a birthday present about 2 years ago. Unfortunately because you can only order online colour matching is difficult and they do not accept returns.

My tanned shade is caramel. It is a very fine powder and when buffed into the skin blend well and looks very natural. It gives a light to medium coverage but can be built up if needed. The kit came with a small kabuki brush which is the softest brush I own and such a pleasure to use.


As much as I like afterglow cosmetics I would not order them again in the UK since colour the problem of colour matching is such a problem and at £30 for the full foundation it is not something you can just afford the luxury of buying to test out. If you are in the US they are happy to take returns so worth looking into if you are after a mineral foundation.

Share:

Monday 26 September 2011

My address is Hollywood

So I finally removed my shellac nails. On this occasion I had them on for over 3 weeks with no chipping occurring at all, but my nails were very long and I was so so bored of the colour!


I started by just soaking my nails in nail polish remover (acetone) and when it looked like the polish was coming away from the nail using an orange stick to remove it by gently scrapping away. This took a long time as you can imagine so I decided to replicate the salon manicure by soaking cotton pads in acetone and wrapping these around my nails and leaving them for about 10 minutes, until the polish started to lift. After all the polish was removed, I buffed all over the surface of my nails and filed them down a lot!

For this week I chose the newest of my auto-delivery OPI colours from QVC.


French Quarter For Your Thoughts lacquer (grey)
Plugged-In Plum lacquer (purple)
My Address Is Hollywood lacquer (rose pink)

The shade is from the 2011 autumn collection, “My address is Hollywood” and is a great transitional shade in my opinion. It is a pink-peach with a subtle gold shimmer. The polish dried very quickly and went on well, with one coat enough to get full coverage and a good finish.


My major complaint with polish is that within 3 days whole sections of the nail polish peeled off. I am hoping with the use of a different base coat this won't happen and that the quality of the nail polish isn't so poor. Needless to say this is not what I would expect from a brand like OPI, so I am hoping the other two polishes give a better first impression.

Share:

Wednesday 21 September 2011

Inspired by Marie Claire - Beauty Journalism

I had the chance to attend another Marie Claire inspire and mentor event tonight this time about 'how to get into the beauty industry' including journalism, PR and makeup artistry. It was so inspiring and motivational that I am actually writing this post on the tube ride home.

I have lots of goodies from Estee Lauder which I am really excited to try and some great tips from makeup artist Alan Pan, which I will share in another post once I have had a chance to put them into practice!

It was great to learn that I am on the right path to a career in beauty writing/ journalism. Starting the blog being one of a few tips mentioned.

I'm pleased to say I plucked up the courage to ask questions to Lisa Oxenham, beauty and style director /editor of Marie Claire. She was really helpful and gave me some food for thought with my blog and promoting myself in order to ‘break into’ the career.

This in turn has made me want to ask for your input. I would love as much feedback as possible on my blogs and writing style in general (if i have one!). Let me know, do you enjoy reading my posts? and why? What can I do better? I know writing and beauty writing is a skill I need to keep working on, so constructive comments good and bad on this post as well as ones in the future would be really appreciated.

One of her recommendations was to find a niche and be known for that. Which makes complete sense. When I think about this, as much as I love makeup and haircare my main interest has always been skincare.

Part of me doesnt really want to change my blog so much to only focus on one area especially since I know that you have to try a regime for a while before you can really know if it works. Also the scientist in me knows that for something to be a fair test you have to minimise the variables, which would mean I would post a product review every few months! Not ideal for a blogger.

However, I know this gives me the chance to be creative with my blog by branching out and talking more about ingredients and skin generally.

Again I want your thoughts on this, after all I wont ever be successful if people don't actually read what I write! Hopefully you can tell how excited and motivated I am right now, I can't wait to hear from you.

With love, 
Share:

Monday 19 September 2011

Quick Review - Bed Head

TIJI Bed Head Foxy Curls shampoo and conditioner is another hair care range which excludes all the bad detergents and irritants contained in regular haircare products. Of the sulphate free, SLS free, not full of bad stuff hair care ranges I have tried this has been my favourite so far.


The shampoo has a very sweet and fruity scent which I love. Best of all it lathers up the most of all the natural products I have used which means it spreads well though the hair and makes me feel like I have had a really good clean. The conditioner doesn’t have as strong a scent but moisturises the hair well.

The product claims that (being for curly hair) it will reduce frizz and increase shine. In the time I have been using this I can’t say I have actually noticed these effects.

I managed to pick these up for £6.99 each in TK Maxx, which I know is quite sporadic with stock supply, so do not know how easy it would be to find these again.

Although this is the best of the hair products I have tried recently, part of me is not loving using the sulphate/SLS free products because although I know they are better for me in terms of toxin exposure, I don’t like how my hair feels and more importantly looks greasier so soon after washing.

Share:

Saturday 17 September 2011

Rimmel Nude Delight

I have searched a long time for the perfect nude lip colour. Shade have either been more of a pink or made me look dead they are so pale (ELF natural nymph!).

The shade nude delight by Rimmel has been one I have had my eye on for a long time. I had such a fear that it was going to end up another waste of money that I kept picking it up and putting it back again, but I finally took the plunge when Rimmel were offering a free black liquid eyeliner with any purchase (I don’t need one, I’m just a sucker for a deal).


It turns out it is the perfect nude! I was so glad when I finally tried it, this I know will become my favourite lipstick and it definitely my ‘my lips but better’ shade.


It’s not a very hydrating lipstick especially considering it is labelled as the moisture renew range, but I can forgive that considering how much I love the colour. It isn’t very long lasting either, but again, forgivable.

I think it was around £6.49, so a standard price for a drug store lipstick, but I think I would always hold out for some sort of offer rather than pay the full price!

Share:

Thursday 15 September 2011

Quick review: ELF mineral blemish kit

After using the Bare Minerals night treatment and finding it to be nothing more than a good spot treatment I wanted to try out the ELF mineral blemish kit and see if this could be my dupe. The blemish kit contains 30% sulphur as its active ingredient which is meant to kill the bacteria on the skin.


In short I found this product to work okay, I ‘luckily’ had a small breakout just below my lip which gave me the perfect opportunity to test this. On the first night I applied it overnight and the spot was reduced by the morning. As the day went on though it seemed to ‘grow again’ and took me a few days for it to clear even though I was applying it every night. The skin around the spot did become a little dry and flaky which is common with sulphur containing products.


Although the colour is meant to be sheer, it is very shimmery which in my opinion makes it no good for use in the day. The colour is very light and doesn’t blend in well to the skin.

Everything else about the product is great, the packaging is sleek, the concealer concealer brush supplied works well in picking up the minerals and you get a generous amount of product for your money. That being said, I managed to pick this up in the 50% off promotion and I think £3 is a much more reasonable price for it than the normal £6.

I will continue to use this, as it does help somewhat although there are better products out there for the occasional blemish. It is definitely something I would not recommend to anyone with more severe acne or breakouts.

Share:

Monday 12 September 2011

Eye brights collab with CurvesColourSparkle (picture heavy)

At the weekend I got the chance to do a collaboration with the beautiful Jennifer from the blog CurvesColourSparkle. She is a makeup artist whose forte in my opinion is bright colours and bold eye looks although she does do bridal makeup and high fashion make up too.

Any regular readers of my blog will know my default eye look is a brown/neutral eye so when I mentioned on twitter that I struggled with colour on my eyes Jennifer suggested that we collaborate and she could show me how to wear colour. I of course agreed!

On the day we organised to meet I happened to be invited to a wedding in the evening. So I took my dress and a selection of makeup along with no idea what I wanted to do! Based on the colours of my dress Jennifer suggested teal and purple so I agreed and let her do her thing.

I took along the Manly 120 eyeshadow palette, which actually belongs to my sister. Before I show you the eye look, I’ll just show you a teaser of the eyeshadow colours used.

Two aquamarine shades over the lid

 Two purple shades used in the crease

This was the finished look. I have to admit it felt very strange to see myself with such a bright colour and even though family agreed it’s not my usual look they really liked it.


You can read in more detail what was used on Jennifer’s blog as well as how it was applied. I had already applied my base of Garnier BB cream and a touch of mineral foundation to set. We used a mixture of the things I brought and Jennifer’s kit. It was really nice to try some new products (even if my shopping list has got longer)


My eyes were primed with Too Faced Shadow Insurance and NYX Jumbo Pencil in ‘Milk’ was applied as a base to bring out the brightness of the colours.

All the eyeshadows used bar one were from the manly palette. I finally got to see and try out some MAC makeup, one of which was the eyeshadow "Naked Lunch used as a highlighter.

My eyes were lined with ELF cream liner in black and we applied the dramatic ELF lashes and mascara. On the lower lash line a teal liner was used and black eyeliner in the lower waterline.

Under the eyes were concealed with MAC select coverup (NC35) which was also used to tidy up the shadow as well my eyebrows which were filled it using Rimmel brow pencil in hazel.

My face was contoured with the Sleek contour kit in light and MAC mineralised skin finish in soft and gentle was used to highlight underneath the eye and a little down the nose. The blush was the shade true rose by L’Oreal.


On the lips I got to try out the most amazing smelling lip primer, Lierac plumping lip cream, which leaves your lips really hydrated. My lips were lined with L’oreal infaillable liner in the shade always toasted and Sleek liquor true colour lipstick. This was layered using the nude shade of the Sue Moxley peach pink lip palette and finished off with a small bit of clear lip gloss.

Completed face and outfit


The beautiful Jennifer and I 

Some great makeup advice/tips from Jennifer:
  • Anyone can wear any colour, you just need to find the right shade for your skin tone
  • When applying eyeshadow pat it on rather than sweep it across the lid to get the intensity of colour. Also pat to blend colours into one another to blend.
  • When you are going for a new look or bold colours, always finish the look completely and see how it comes out before deciding you don’t like it. (I am completely guilty of doing this but it seems so obvious now!)
  • Apply contour with an eyeshadow brush in a small triangle below the cheek bone and blend out with a blush brush.

Check out CurvesColourSparkle not only can you see more photos and more detailed information about how to do the look but also Jennifers other beautiful looks.

Finally thank you Jennifer for such a great day and whenever the day comes and I get married I would love for you to do my makeup. Booking you in now!

Share:

Thursday 8 September 2011

Nails of the week - Silver shatter

I have been really lazy with my nails this week and haven’t removed the shellac polish yet. However, I quickly got bored of the colour and decided to refresh the look with shatter polish!


I used silver shatter by O.P.I. I love this polish, not only for the colour but because the consistency is the thinnest I have used of any shatter polish which makes it really easy to apply.

Interestingly when I applied this straight on-top of my nails the polished dried but didn’t shatter.


I then removed the shatter polish layer with acetone-free polish and applied a layer of top coat to my nails and reapplied the shatter on-top of this, which worked!


I am not completely sure how shatter polish works so if anyone does I would be really interested to know. I assume it is something in the polish it reacts/interacts with, which is not present in the shellac polish. Either way, I love how it can transform the look of any polish.

Share:

Tuesday 6 September 2011

The naked look

Urban Decay’s Naked palette has been extensively swatched and reviewed in many blogs so I don’t feel the need to do that. I was lucky enough to pick one up when it first came out and it probably goes without saying that I love this palette. Any type of brown/neutral eye is my go to look

For this look I first used the NYX jumbo eye pencil in milk. Although the eye shadows are very pigmented I wanted the use the white base to really get the depth of the colours. I should have used a primer though because the base creased badly by the end of the evening.


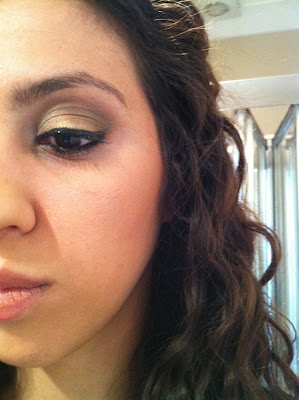
I placed the colour ’sin’ on the inner third of the lid, followed by ‘half baked’ in the center and ’smog’ in the outer corner. I used a mixture of ’smog’ and ‘darkhorse’ in the outer corner and into the crease and made sure to blend all the colours well with a clean brush. I applied a thick line of liquid eyeliner on my upper lash line and lined my upper and lower water line with Urban Decay’s 24/7  eye pencil in zero. 

I also had my first attempt at applying false lashes. Having not used them before I cannot talk about the quality of the set I used. I am just glad that they stayed put all day and were much easier to remove than I expected. 


On the rest of the face I used Garnier BB cream, Afterglow cosmetics foundation to set, ELF eyebrow kit, and Sue Moxley shimmer brick. 


Would you like to see more Naked palette looks? 
Share:

Sunday 4 September 2011

E.L.F haul

I took advantage of the ELF half price sale last weekend and received my package today. Together my sister and I ordered £102 worth of products, which worked out at £25 each after the half price sale and then splitting the cost between us.

I ordered:

Dump bag in burgundy - a lovely colour case which will be perfect for holidays and short breaks as it is bigger than what I own now. As the name suggests it is just one compartment which you dump everything into. I would have preferred it just a little bigger though.


Studio concealer pencil and brush - in the shade light, this is my favourite concealer so I decided to stock up and get two for the price of one.

Mineral blemish kit - considering the bare minerals night treatment worked out as nothing more than an expensive spot treatment I am hoping this may be a good dupe.


Studio cream eyeliner - in the shades black and bronze. The bronze is a beautiful colour, a light brown with a subtle shimmer which is quite pigmented. They each come with a small angled brush which is of a good quality and the size makes it great to keep in your bag or take on trips. They apply smoothly and from first impressions is smudge-proof, but I will put this to the test soon.

Studio lip lock pencil (no image) - the description makes it sound like a clear lip liner which should then keep your lipstick from feathering.


Studio small smudge brush - a very dense stiff brush which is not what I expected but should be good for smudging eyeliner or applying very concentrated colour.

Eye crease brush - although I love my Sonia Kashuk crease brush this is smaller and should allow me to be more precise with my application for some looks. It is surprisingly soft and for 75p if this is the quality of all their brushes I will be very impressed.


Dramatic and natural lash kit - again at 75p each I decided it was time to learn how to wear false lashes.

Studio Hollywood lashes kit - this was the least impressive product. Considering it is the studio line I was expecting a higher quality than the regular lash kits but the lashes don’t look like they are cut to the same shape and the quality of the applicator is really low. For the price though I cannot be bothered with the hassle of a return so if it turns out they do look odd I may have to trim them to look even.


Juiced berry super glossy lip shine - I have always been disappointed with the lip products only because the colours are so different to what you see online. In this case juiced berry is nothing more than a clear gloss even though the tube makes it look like it should be bright and pigmented.


Studio small makeup holder - I wanted something to contain the brushes I use on a daily basis. The size of the holder is perfect but the finish isn’t great and had I paid more than £2.50 I would be disappointed, but it does the job so I can’t complain.

Overall I am very pleased with my order and have a mental list in my head of my next! I think ELF did very well to get the order out to me within a week considering I can imagine the stock/orders room must have been manic.

Share:
© Discovering Beauty | All rights reserved.
Blogger Template Designed by pipdig